This post contains affiliate links. This simply means that if you click on one of my links, and make a purchase from that link, I will receive a small commission. This is at no extra cost to you.
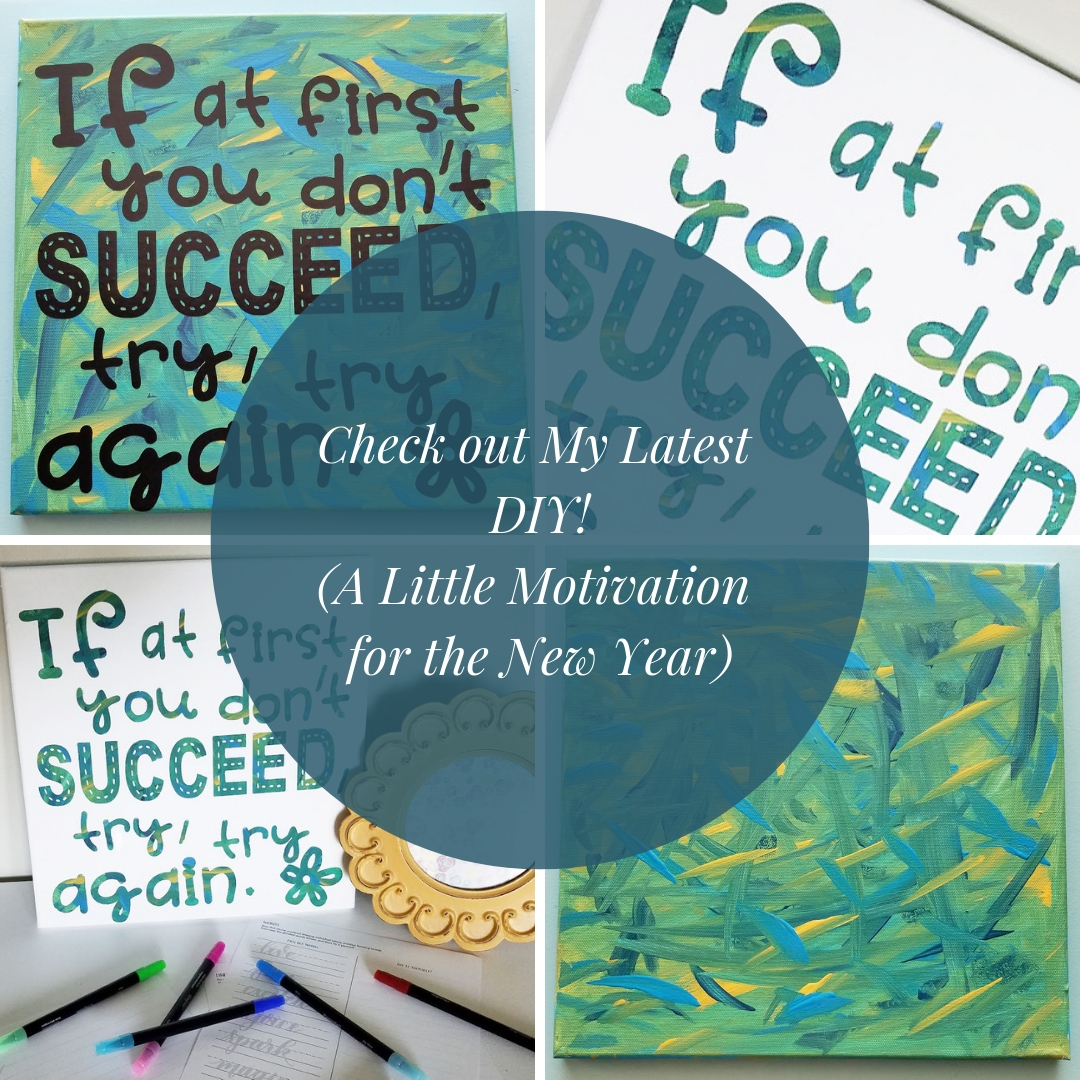
How do you like my latest DIY? I’m pretty excited with how it turned out! The inspiration behind this project lies in the fact that we just started a new year, and, as with many of you, I like to set goals. When I say this, I don’t mean things like “I will never ________________ again.” or “This year I will make drastic changes to my life”. I’m sure we’re all familiar with the sad statistics about how quickly people give up on their New Year’s Resolutions, so I decided to make myself a little reminder that you never really fail until you give up trying.
Did you know that the phrase, “If at first you don’t succeed, try, try again” has been traced back to an early 1800’s Teacher’s Manual written by Thomas H. Palmer? Apparently, it was used to help motivate students to do their homework. I love that! For those of you that don’t know, I taught in a public Elementary School before my kids started coming along, and I truly have a “teacher heart”. One of the most frustrating things, as a teacher, is to watch one of your kids give up on something when you know they are SO close to getting it. On the flip side, one of the BEST parts of being a teacher, is watching someone overcome something super hard and find success after many, many failed attempts.
While I can be super optimistic about other people’s abilities to overcome their challenges and obstacles, it’s hard for me to do that for myself. They say that we are our own worst critics, and, at least in my case, that is definitely true. In fact, if you were to come over to my house today and tell me that my new motivational quote was cute, I’d probably pull it out and point out all the flaws to you. Can you relate? Why is it that we are so hard on ourselves? Why do we let discouragement and disappointment have so much power in our lives? I don’t know the answers to these questions, but I do know that a little visible reminder to “keep at it” a little bit longer helps me a lot. And it helps if it’s cute! Would you like to make something like this for yourself? Well . . . keep reading, and I’ll share with you the steps I took to make this one. It’s a pretty simple project, actually, and is great for a cold, gloomy winter day. (Something January is well know for here in Utah).
Are you ready? Then let’s get going!
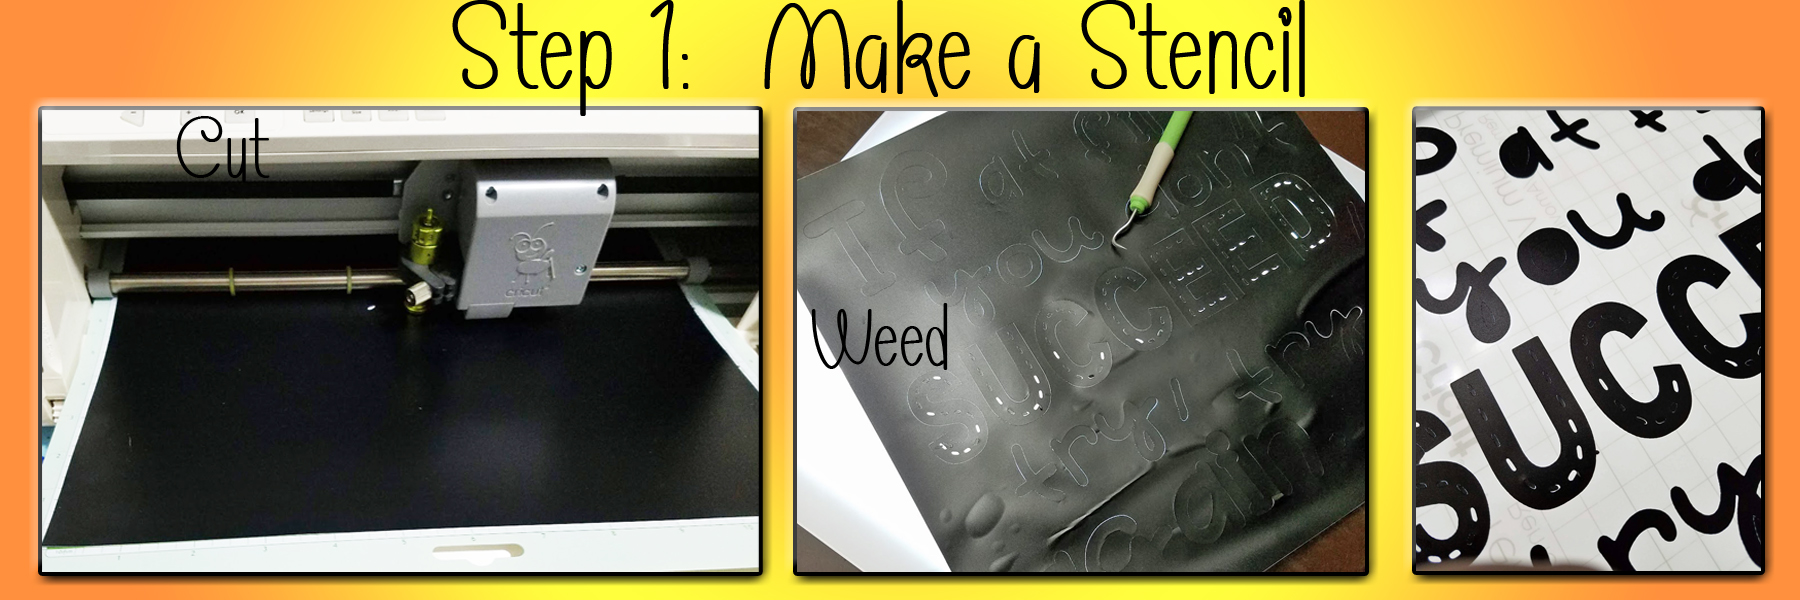
If you happen to own a Cricut or other type of cutting machine, this step is going to be pretty simple and straightforward. My Cricut is pretty old-school, but it worked awesome for this project. I designed the way I wanted things to look, then had my Cricut cut them out using removable vinyl. Once the machine had done its magic, it was time to get rid of the excess vinyl (aka weeding). I used my Cricut Bright Pad to help with this, as it helped me to see the cut lines better. Light is pretty amazing at sneaking through any place that has even the tiniest of gaps! When weeding, get rid of everything you don’t want to be colorful. In my case, that meant everything except the words.
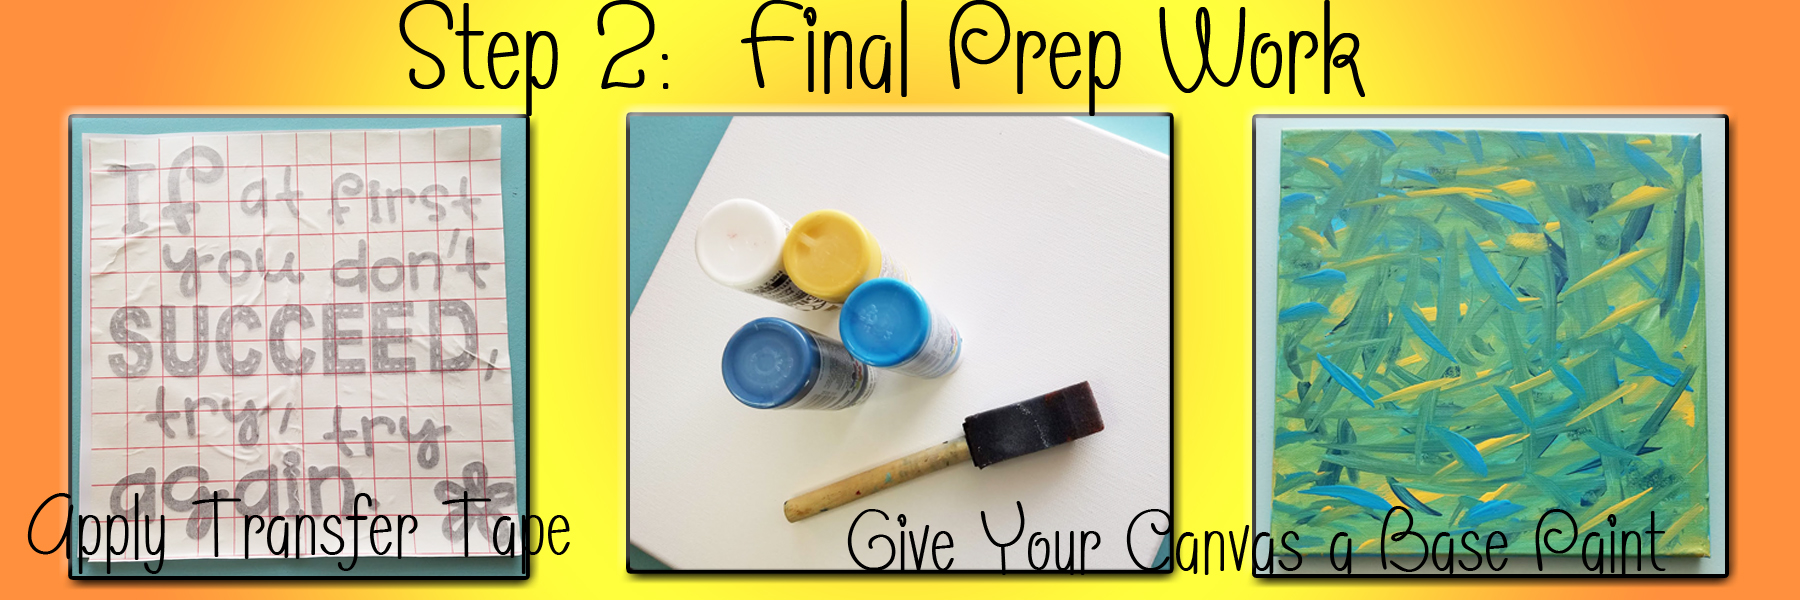
Once you get your vinyl weeded, you’ll need to apply some transfer tape to it so you will be able to move it to your canvas when you are ready.
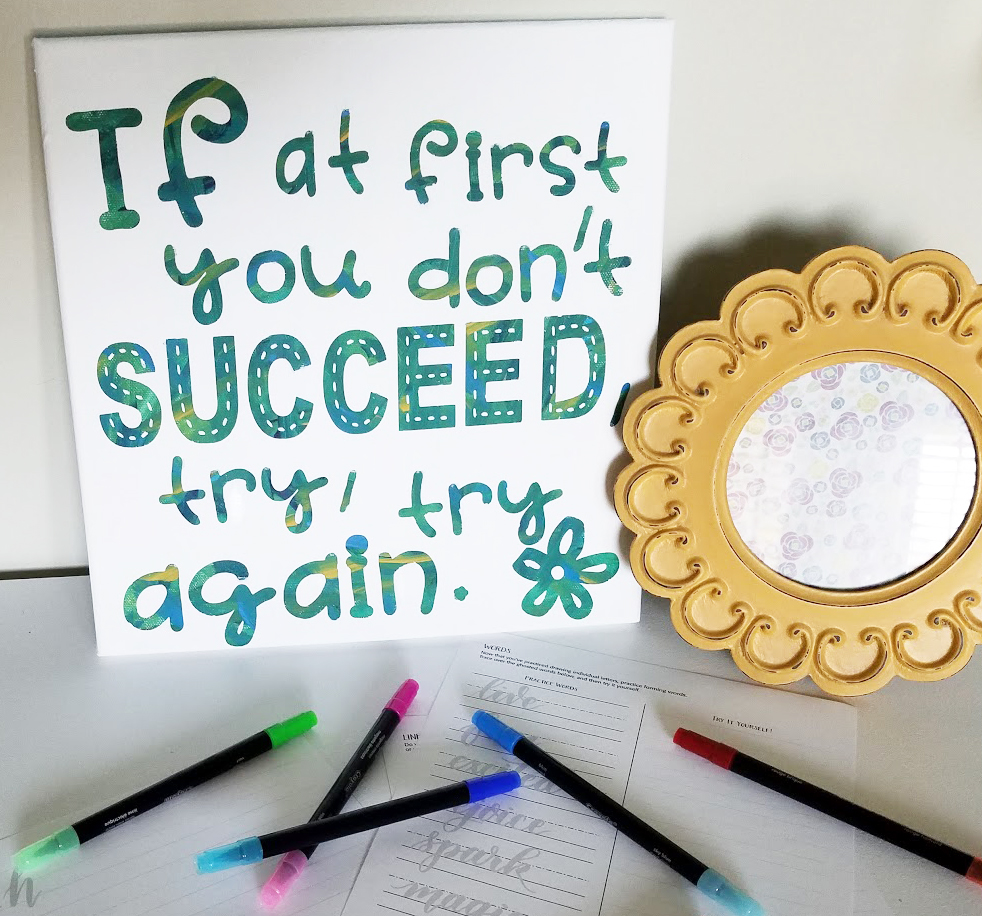
I used a 12×12 canvas for this project, which I picked up at Hobby Lobby for just a couple dollars. Depending on what kind of look you want from your project, you can paint your canvas one single color, or mix a few different ones. As you can see, I chose to use three different colors for my project. There’s really no rhyme or reason to how you paint your canvas, just get the whole thing covered up. If you don’t want your colors to mix, do one at a time and let them dry in between coats. I’m not patient enough to wait for things to dry, so I made sure to pick colors that I knew would mix well. As in, yellow and blue make green. Once your canvas is painted, you’re ready to put everything together!
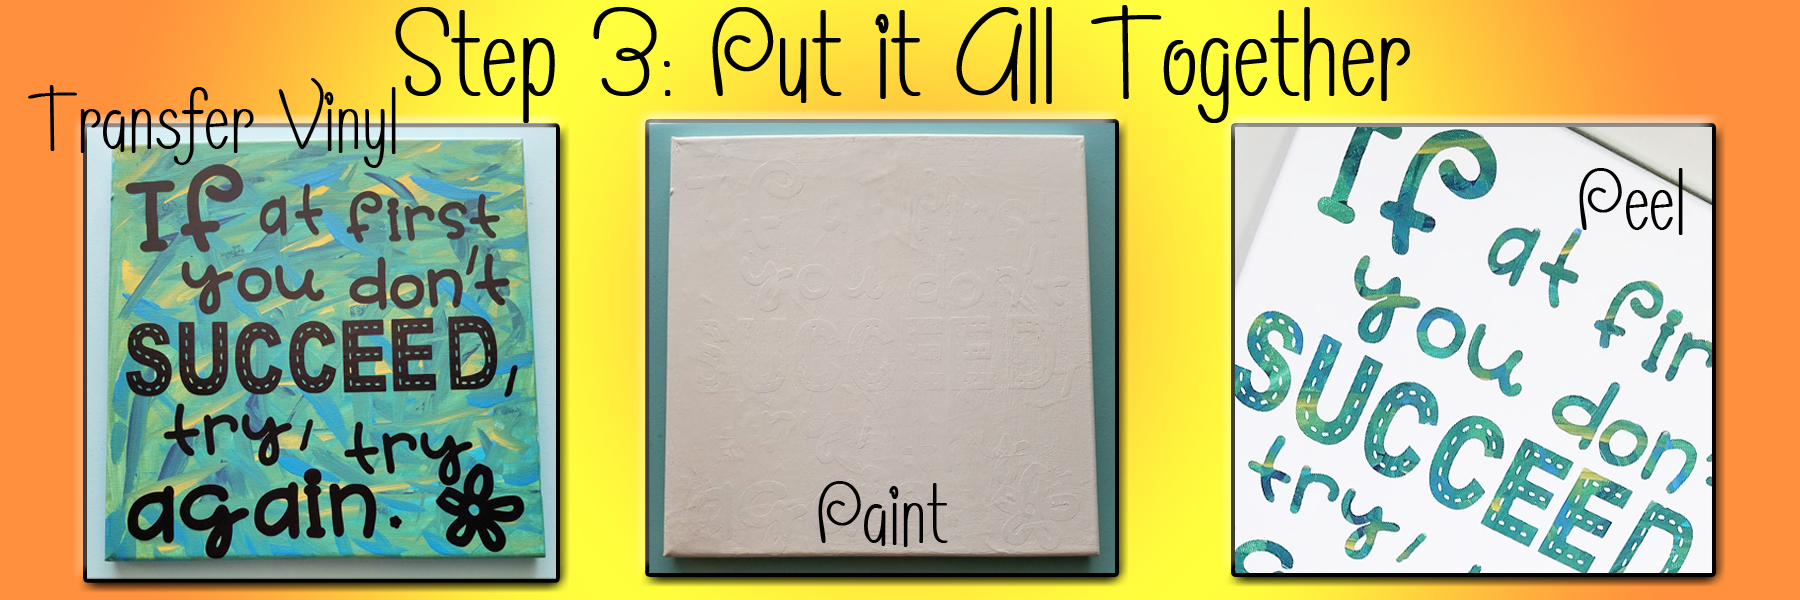
This is one time you do need to wait for the paint to dry. Feel free to use a hair dryer if you want to. I totally did. Once your canvas is painted, and dry, you’re ready to apply the vinyl. Before you move on to the next step, go over all of the vinyl pieces and make sure they are stuck down firmly. You don’t want paint bubbling through where it’s not supposed to be! As soon as you feel like you’re ready, pull out your paint brush and go to town. Cover the whole thing! I ended up putting three coats of white on this one, and yes, a hair dryer was definitely involved in that process.
This is when it becomes magical! When you’re ready, peel of the vinyl to expose the painted canvas underneath. I love the way every letter has a unique color pattern, because the canvas underneath was such a hodge podge. I hope your project turns out to be something that will make you smile, and help you remember to focus on good things each day.
And, if you have a bad day where things just don’t go your way, remember: “If at first you don’t succeed, try, try again!
This project was created for January 2019’s “Inspire My Creativity” link party. This month’s theme? Free for all! I’m lucky enough to co-host this link party with some pretty amazing ladies – make sure you check out their blogs (links below) for more fun projects!
Shani | Sunshine & Munchkins
Christine | Swordfights & Starry Nights
Meg | See The Happy
Candice | She’s Crafty
Julia | The Quiet Grove
Heather | Glitter On A Dime
Rachel | Adventures of a DIY Mom
Jenny | Cookies, Coffee and Crafts
Anna | Practical and Pretty
Keala | Recipe For A Sweet Life
Carmen | Living Letter Home
Cathy | A Boy and His Mom
Sarah | The Strawberry Nest
Adree | The Keele Deal
Aimee | Things Small and Simple {You Are Here}
Teri | T. Moore Home

I love this sentiment and your board is so cute!
What a darling project! I love the quote and the way you styled it. So cute!
I have said it before and I will say it again. This is my most favorite. I love the saying, I love the colors. You did an amazing job my friend.
This is awesome! I love that quote. I need to make a resolution to use my cricut more this year for cute ideas like this.
Great motivation message and I love the colors! Very pretty!